Hi everybody!
Today we're kicking off the third year of Blogtober! This is technically my fourth year doing this, as the first year was on a previous blog, and I've always looked forward to doing it. Essentially, I'll have a new post up every day for the month of October. It's a really fun challenge for me, and it pushes me to be a bit more creative with my content. I'm really looking forward to it!
Also, I cut my hair. I've been a bit more daring with my hair in the past few years. I realized that, hey, it actually grows back! So last summer, I chopped off over a foot and donated it. I loved the change. The summer before that, I tried my hand at cutting my own hair, and I chopped in some bangs. I also really loved that as well. So, I started cutting my hair some more. A few weeks ago, I snipped off a few inches, and today, I cut my bangs back in. I'm really digging the combo of shorter hair, and bangs. I'd forgotten just how much cuter ponytails and other hairstyles are with a fringe!
Before:
After:
I hope you enjoyed!
<3 Lucero
Song of the Day: Hideaway by Kiesza
Showing posts with label DIY. Show all posts
Wednesday, October 1, 2014
Saturday, September 6, 2014
How to Fix Broken Makeup
Hi everybody!
If you’ve ever broken a beautiful compact or awesome blush, you know how heartbreaking it can be. You may even feel like your favorite makeup item is gone forever. Don’t lose hope! There’s a solution.
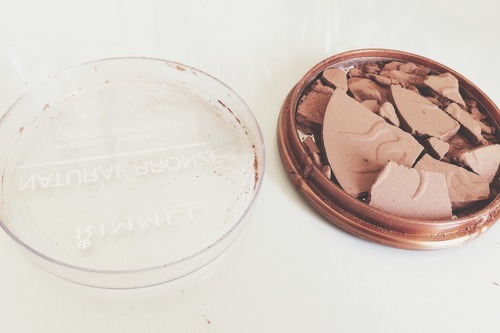
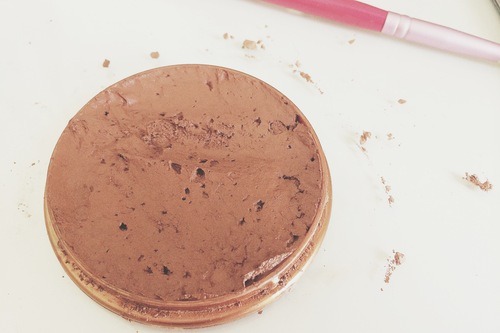
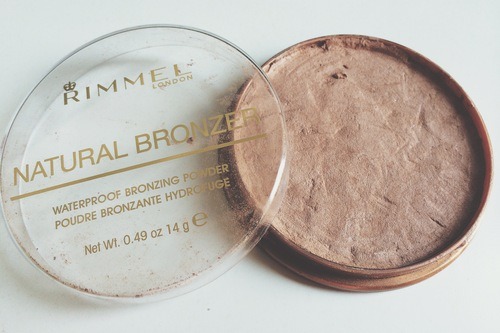
Step 1: Retrieve your broken makeup product and cry a little. Here, I lost a beautiful Rimmel London bronzer on the trip back to Dubai.

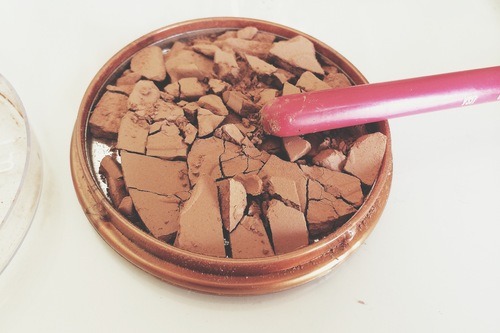
Step 2: Wipe away your tears and against your better judgement, crush up the makeup even more. It doesn’t have to be super fine, just make sure it’s in a bunch of small pieces.

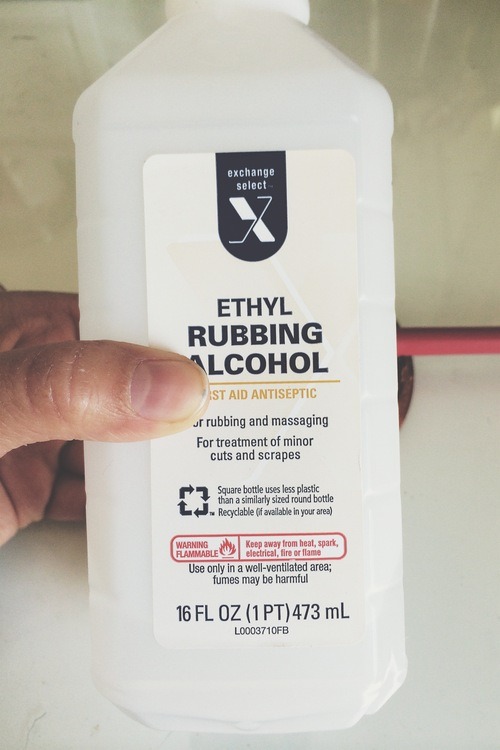
Step 3: Grab rubbing alcohol. I used ethyl, but you can also use isopropyl. This is your key to fixing up your makeup.

Step 4: Gradually begin adding in the rubbing alcohol to your powder. Do this slowly, you don’t want to drown it.

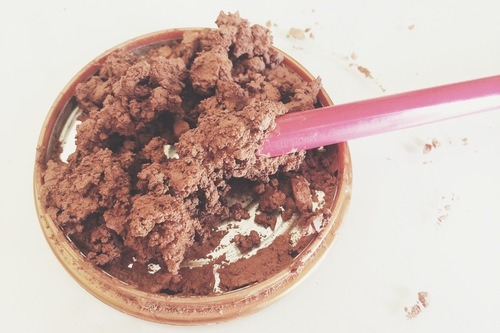
Step 5: Add more rubbing alcohol as you mix until you get a thick paste. It shouldn’t be too runny. Also, make sure the paste is well mixed to avoid air bubbles or dry clumps.

Step 6: Smooth out the makeup and let it sit overnight. If you want to add an emblem or decoration to the surface, this is the time to do it.

Step 7: Admire your saved powder and wear it proudly. [Note: you may need to scrape off a little of the surface once it dries, because the rubbing alcohol might leave a film.]

I hope you enjoyed, and that all of your future beauty products are saved!
<3 Lucero
Song of the Day: How to Save a Life by The Fray
If you’ve ever broken a beautiful compact or awesome blush, you know how heartbreaking it can be. You may even feel like your favorite makeup item is gone forever. Don’t lose hope! There’s a solution.
Step 1: Retrieve your broken makeup product and cry a little. Here, I lost a beautiful Rimmel London bronzer on the trip back to Dubai.

Step 2: Wipe away your tears and against your better judgement, crush up the makeup even more. It doesn’t have to be super fine, just make sure it’s in a bunch of small pieces.

Step 3: Grab rubbing alcohol. I used ethyl, but you can also use isopropyl. This is your key to fixing up your makeup.

Step 4: Gradually begin adding in the rubbing alcohol to your powder. Do this slowly, you don’t want to drown it.

Step 5: Add more rubbing alcohol as you mix until you get a thick paste. It shouldn’t be too runny. Also, make sure the paste is well mixed to avoid air bubbles or dry clumps.

Step 6: Smooth out the makeup and let it sit overnight. If you want to add an emblem or decoration to the surface, this is the time to do it.

Step 7: Admire your saved powder and wear it proudly. [Note: you may need to scrape off a little of the surface once it dries, because the rubbing alcohol might leave a film.]

I hope you enjoyed, and that all of your future beauty products are saved!
<3 Lucero
Song of the Day: How to Save a Life by The Fray
Wednesday, November 20, 2013
DIY Sweater Beanie
Hi everybody!
I'm back with a DIY tutorial! As I was going through my winter wardrobe, I noticed that there were a few sweaters I hadn't worn in a while. Instead of throwing them away, I thought it'd be fun to transform a plain old sweater into a cute beanie!
What you'll need:
A sweater to cut up
Scissors
A ruler
Needle and thread/ fabric glue
This is an old tan sweater I've had for ages from Zara. I think it was on sale in the kids' section, but it's only been worn a handful of times. The color is rather yawn-worthy, and I honestly never want to wear it again.
To start off, cut straight across under the armpit. This doesn't need to be perfect, you'll be doing additional cutting later.
Wrap the waistband around your head, and measure out how long it'll need to be. Instead of creating an entirely new edge for the hat, we'll use the bottom hem of the sweater.
Next, fold the sheet of fabric into thirds or quarters. It's your call. Then cut a dome shape at the top.
Now it's time to seal the edges in. Either sew, or use fabric glue to close it up. If you're using glue, wait a 10-15 minutes before attempting to wear it.
Finally, flip the beanie inside out, and you're ready to go! Done!
I hope you enjoyed!
<3 Lucero
Song of the Day: Bang Bang Bang by Mark Ronson
I'm back with a DIY tutorial! As I was going through my winter wardrobe, I noticed that there were a few sweaters I hadn't worn in a while. Instead of throwing them away, I thought it'd be fun to transform a plain old sweater into a cute beanie!
What you'll need:
A sweater to cut up
Scissors
A ruler
Needle and thread/ fabric glue
This is an old tan sweater I've had for ages from Zara. I think it was on sale in the kids' section, but it's only been worn a handful of times. The color is rather yawn-worthy, and I honestly never want to wear it again.
To start off, cut straight across under the armpit. This doesn't need to be perfect, you'll be doing additional cutting later.
Wrap the waistband around your head, and measure out how long it'll need to be. Instead of creating an entirely new edge for the hat, we'll use the bottom hem of the sweater.
Next, fold the sheet of fabric into thirds or quarters. It's your call. Then cut a dome shape at the top.
Now it's time to seal the edges in. Either sew, or use fabric glue to close it up. If you're using glue, wait a 10-15 minutes before attempting to wear it.
Finally, flip the beanie inside out, and you're ready to go! Done!
I hope you enjoyed!
<3 Lucero
Song of the Day: Bang Bang Bang by Mark Ronson
Saturday, October 26, 2013
DIY SpiderWeb Nails
Hi everybody!
I'm back with another easy and fun Halloween themed nail tutorial. Today we're doing spiderweb nails, with an accent spider on the ring finger. You'll need about three or four colors, depending on the color scheme you want. I chose opaque black and gray for the spiderweb nails, and green and sparkly black for the spider nail.
Begin by applying one to two coats of your base colors. I chose green for the accent nail, but purple or blue would also look really nice.
Using a bobby pin as a striping tool, I've dipped it into the gray and begun making the stripes needed for the spiderweb. Then, it was just a matter of connecting them with perpendicular lines.
With the spiderweb nails finished, I moved on to the spider nail. I dropped a dot of nail polish onto the very center of the nail, and drew 8 little sticks pointing outward. You can create bends in the legs, I simply don't have enough room on my nail bed.
Ta-da! You're done!
I hope you enjoyed!
<3 Lucero
Song of the Day: Re - Stacks by Bon Iver
I'm back with another easy and fun Halloween themed nail tutorial. Today we're doing spiderweb nails, with an accent spider on the ring finger. You'll need about three or four colors, depending on the color scheme you want. I chose opaque black and gray for the spiderweb nails, and green and sparkly black for the spider nail.
Begin by applying one to two coats of your base colors. I chose green for the accent nail, but purple or blue would also look really nice.
Using a bobby pin as a striping tool, I've dipped it into the gray and begun making the stripes needed for the spiderweb. Then, it was just a matter of connecting them with perpendicular lines.
With the spiderweb nails finished, I moved on to the spider nail. I dropped a dot of nail polish onto the very center of the nail, and drew 8 little sticks pointing outward. You can create bends in the legs, I simply don't have enough room on my nail bed.
Ta-da! You're done!
I hope you enjoyed!
<3 Lucero
Song of the Day: Re - Stacks by Bon Iver
Thursday, October 24, 2013
DIY Heatless Waves
Hi everybody!
I really enjoy having curls in my hair, I feel like it's a nice change of pace. However, I don't like putting too much heat (or effort, for that matter) onto my hair, as I like to keep it as strong and shiny as possible. Heatless headband curls are the perfect solution for me, because it's easy, effortless, and provides amazing curls.
For this look, you'll need a hair brush, a thin elastic headband, and a few bobby pins. Start out with damp hair and brush out any tangles. If you want, you can add a texturizing spray at this step.
Next, push your fringe area forward and slide the head band on top of your hair. Try to keep your hair as smooth as possible, it helps with both rolling up the hair and taking it out.
Start out with a small section in the front, roll, it and pull it up and over the elastic band. Grab another small section of hair, combine it with your twist, and pull it over the elastic band.
Do this on the side until you reach the back, then start on the opposite side. It helps to use bobby pins to keep the hair in place as you roll and pull through the elastic.
Once you have rolled all the way to the back, take the the last few strands and pin them up in a curl. You can also tuck the little curl into your headband in the back, whichever is easier.
Now that your hair is all in place, hairspray to keep the flyaways down. You can sleep in this overnight, or just wear it for a few hours as your hair dries.
Once you're ready to take out the curls, undo your steps starting in the back. Don't yank on the headband, it'll only create tangles.
Tousle your curls with your fingers, and you're good to go!
I hope you enjoyed!
<3 Lucero
Song of the Day: Wake Me Up by Avicii
I really enjoy having curls in my hair, I feel like it's a nice change of pace. However, I don't like putting too much heat (or effort, for that matter) onto my hair, as I like to keep it as strong and shiny as possible. Heatless headband curls are the perfect solution for me, because it's easy, effortless, and provides amazing curls.
For this look, you'll need a hair brush, a thin elastic headband, and a few bobby pins. Start out with damp hair and brush out any tangles. If you want, you can add a texturizing spray at this step.
Do this on the side until you reach the back, then start on the opposite side. It helps to use bobby pins to keep the hair in place as you roll and pull through the elastic.
Once you have rolled all the way to the back, take the the last few strands and pin them up in a curl. You can also tuck the little curl into your headband in the back, whichever is easier.
Now that your hair is all in place, hairspray to keep the flyaways down. You can sleep in this overnight, or just wear it for a few hours as your hair dries.
Once you're ready to take out the curls, undo your steps starting in the back. Don't yank on the headband, it'll only create tangles.
Tousle your curls with your fingers, and you're good to go!
I hope you enjoyed!
<3 Lucero
Song of the Day: Wake Me Up by Avicii
Tuesday, October 22, 2013
DIY Jewelry Upcycling
Hi everybody!
I'm a big fan of costume jewelry. They're inexpensive and fun to wear, but sometimes I get tired of my old pieces. Instead of throwing them out, I like to upcycle them with nail polish. This is a good way to create an entirely new piece of jewelry from what you already have, as well as add a creative touch to your jewelry.
You'll need inexpensive jewelry, and assorted nail polish colors.
One trick I like to do is cover the rhinestones with nail polish. I find that too many rhinestones can look a bit tacky. Covering them with nail polish helps them look more like semi-precious jewels instead. For more precision, use a bobby pin to apply the polish instead of the brush.
I also like to ombré my jewelry. Pick a handful of polishes with a similar color scheme. Apply the colors to the jewelry piece one my one, blending with a cotton pad in between colors. This helps smooth out the transition between colors.
Here are the finished jewelry pieces along with other rings and necklaces I've revamped over the years.
I hope you enjoyed!
<3 Lucero
Song of the Day: Plain Gold Ring by Kimbra
I'm a big fan of costume jewelry. They're inexpensive and fun to wear, but sometimes I get tired of my old pieces. Instead of throwing them out, I like to upcycle them with nail polish. This is a good way to create an entirely new piece of jewelry from what you already have, as well as add a creative touch to your jewelry.
You'll need inexpensive jewelry, and assorted nail polish colors.
One trick I like to do is cover the rhinestones with nail polish. I find that too many rhinestones can look a bit tacky. Covering them with nail polish helps them look more like semi-precious jewels instead. For more precision, use a bobby pin to apply the polish instead of the brush.
I also like to ombré my jewelry. Pick a handful of polishes with a similar color scheme. Apply the colors to the jewelry piece one my one, blending with a cotton pad in between colors. This helps smooth out the transition between colors.
Here are the finished jewelry pieces along with other rings and necklaces I've revamped over the years.
I hope you enjoyed!
<3 Lucero
Song of the Day: Plain Gold Ring by Kimbra
Saturday, October 12, 2013
DIY Sea Salt Spray
Hi everybody!
One of my favorite hair products is sea salt spray. It adds texture and volume, for effortlessly beautiful hair. However, it can be pretty expensive, with even drugstore brands charging $10 for a small bottle. Here is a recipe to make it yourself at home, for a fraction of the cost!
You'll need:
an 8 fl oz bottle
2 tbsp of kosher sea salt
1 tsp of hair conditioner
1 tsp of hair gel
1 tsp coconut spray (optional)
Add the ingredients to your bottle, and add warm water until full. Then, shake and apply to your hair after a shower.
I like to use the hair to add texture to my heatless headband curls. It's my favorite method of getting curly hair, and I've even made a tutorial for that, as well.
I hope you enjoyed!
<3 Lucero
Song of the Day: Wicked Game by Chris Isaak
One of my favorite hair products is sea salt spray. It adds texture and volume, for effortlessly beautiful hair. However, it can be pretty expensive, with even drugstore brands charging $10 for a small bottle. Here is a recipe to make it yourself at home, for a fraction of the cost!
You'll need:
an 8 fl oz bottle
2 tbsp of kosher sea salt
1 tsp of hair conditioner
1 tsp of hair gel
1 tsp coconut spray (optional)
Add the ingredients to your bottle, and add warm water until full. Then, shake and apply to your hair after a shower.
I like to use the hair to add texture to my heatless headband curls. It's my favorite method of getting curly hair, and I've even made a tutorial for that, as well.
I hope you enjoyed!
<3 Lucero
Song of the Day: Wicked Game by Chris Isaak
Wednesday, October 9, 2013
Journal Inspiration
Hey everybody!
I've recently gotten better at keeping journals around for lists and ideas and such. I have to admit, my favorite part of getting a new journal is decorating them! Moleskine journals are perfect for this, because they come in a variety of solid colors, and I really like the how the pages are lined, the spacing is perfect for my small handwriting.
This first journal is covered in Egyptian stamps. At some point when I was in middle school, I really wanted to collect stamps. I'm not sure why I wanted to, but I didn't collect very many. It turns out stamp collecting is easier when you actually send and receive letters. Anyways, when I spotted a stamp booklet in a gift shop in Egypt, I grabbed them immediately and really never had a use for them until now. I currently use this journal (fittingly, I might add) to document my attempts at learning Arabic.
This second journal has an instagram photo of mine pasted onto it. I really liked the idea of cutting up pictures, and interlacing two together. However, I accidentally cut the one shown here vertically, and the other horizontally. Thus, I decided to just use one photo for this journal. I mostly use this journal for various lists and things to remember.
The last journal I made myself from an old H&M bag. The inside is filled with 8.5 x 11 printer paper cut in half. The key to getting the papers to lie flat is to cut half of them with 1 inch slits at the top and bottom, along halfway fold. The other half of your papers should have a giant slit down the middle, beginning and ending 1 inch from their respective borders. You should then be able to slide 1 paper with top and bottom cuts inside 1 paper with the giant lengthwise cut, and stack accordingly. Stapling the papers together also works just fine.
I hope you enjoyed!
<3 Lucero
Song of the Day: Don't Let Me Fall by Lenka
I've recently gotten better at keeping journals around for lists and ideas and such. I have to admit, my favorite part of getting a new journal is decorating them! Moleskine journals are perfect for this, because they come in a variety of solid colors, and I really like the how the pages are lined, the spacing is perfect for my small handwriting.
This first journal is covered in Egyptian stamps. At some point when I was in middle school, I really wanted to collect stamps. I'm not sure why I wanted to, but I didn't collect very many. It turns out stamp collecting is easier when you actually send and receive letters. Anyways, when I spotted a stamp booklet in a gift shop in Egypt, I grabbed them immediately and really never had a use for them until now. I currently use this journal (fittingly, I might add) to document my attempts at learning Arabic.
I hope you enjoyed!
<3 Lucero
Song of the Day: Don't Let Me Fall by Lenka
Saturday, October 5, 2013
DIY Jack-O-Lantern Nails
Hey everybody!
I've been really fascinated with nail design recently, and really wanted to come up with one of my own. My nail beds are really small, so it can be hard to recreate super intricate designs. However, this jack-o-lantern design is both seasonal AND suitable for small nails, so it's a win-win!
The two polishes I used for this design are Butter London's Union Jack Black, and Ruffian's Fox Hunt.
First, paint your nails with the base color. If needed, apply two coats for full opacity.
Using a toothpick or a nail design tool of your choice, draw in the two triangles for the eyes. It's easier if you press the color in, rather than try to brush it on.
Next, draw in the smile. I found the easiest way was to draw the smile with a single missing tooth. Any more than that, and it gets really complicated.
Finally, draw on thin lines longitudinally. These give your nails that pumpkin-like effect. You're done!
I hope you enjoyed!
<3 Lucero
Song of the Day: Your Song as sung by Ellie Goulding
I've been really fascinated with nail design recently, and really wanted to come up with one of my own. My nail beds are really small, so it can be hard to recreate super intricate designs. However, this jack-o-lantern design is both seasonal AND suitable for small nails, so it's a win-win!
The two polishes I used for this design are Butter London's Union Jack Black, and Ruffian's Fox Hunt.
First, paint your nails with the base color. If needed, apply two coats for full opacity.
Finally, draw on thin lines longitudinally. These give your nails that pumpkin-like effect. You're done!
<3 Lucero
Song of the Day: Your Song as sung by Ellie Goulding
Subscribe to:
Posts (Atom)